Monday, September 7, 2009

Lesson #6: Self-Timer--due September 20th

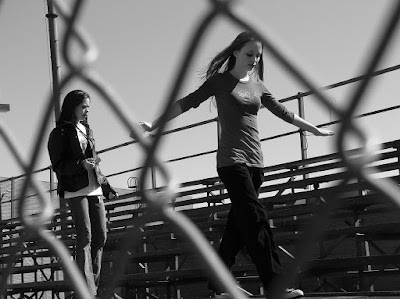
3, 2, 1, Snap!

  • Use the self-timer to capture self-portraits.
  • When using the self-timer, first depress the shutter button halfway to lock focus and exposure. Then fully depress the shutter-release button to trigger the timer.
  • When the shutter-button is pressed, the photo-taker must hurry into position…hopefully before the shutter goes off.
  • Many digital cameras let you select the time it takes for the self-timer to release the shutter, usually between two and 10 seconds.
  • A tripod comes in very handy when using the self-timer. If you don't have a tripod, you will need to find a level surface to rest your camera.
Examples:
Resources:
Let us know that you're playing along. In the comments, tell us which actor/actress you would choose to portray your character in a movie about your life.

Sunday, August 23, 2009

Lesson #5: Macro Mode--WrapUp

We gave Macro mode a try this weekend, but since it was Rob's and my first time getting up close like that, I'm not sure we've totally mastered the technique. We went for the more still life approach rather than the traditional flower approach. That's our style... and most of our plants around here are thirsty.

We kept trying to decide whether our photos were just zoomed-in photos or actually "macro." Rob thinks that he's more of an angles/perspective guy than a macro guy. And, well, I haven't decided what I am. I know that I am curious about how a Macro lens would enhance our technique, and I know that I am still in need of practice with Macro.

How did this challenge go for you?

From Rob of Jana and Rob.

From ljam.

From Jana of Jana and Rob.

Sunday, August 9, 2009

Lesson #5: Macro Mode--due August 23

Getting in close
  • Macro mode is used for capturing up close details of often small subjects.
  • Most cameras use a flower symbol to represent Macro mode. Sometimes it is also represented by the letters "MF," which stands for "macro focus."
  • Macro mode tells your camera to focus on a subject closer to your lens than the usual focal range, and will tell your camera to choose a large aperture (allow a lot of light in) so that your subject is in focus but the background is not.
  • In Macro mode, you have very shallow depth of field, so focus on the part of the subject that's most important to you.
  • A tripod comes in very handy when using Macro mode. If you don't have a tripod, you should practice holding your camera very still.
  • In Macro mode use the digital zoom function to get closer to the subject.
  • When you move close you should use the camera's LCD instead of the optical finder because the LCD shows you roughly what the lens is seeing and what will be recorded on the CCD. If you use the optical finder your subject will be off center because the viewfinder is, unless you have one of the newer digital cameras with an electronic viewfinder that shows the actual image that will be recorded.
Examples:
From Jerry*69.

From Omar Eduardo.

From Licht~~~~.


Resources:
Let us know that you're playing along. In the comments, tell us what your favorite flower is. Remember, photos are due to the Flickr group by August 23!

Wednesday, July 22, 2009

Lesson #4: Leading Lines--due August 2

Following the Leader
  • Use leading lines to draw the viewer's eye through the photograph.
  • Lines can be horizontal, vertical, diagonal, or even curved.
  • Use leading lines to draw the viewer's attention to the focal point.
Examples:

From hubertk.


This is our last composition lesson for awhile. For this week's lesson, take a few shots using lines to lead our eyes to the center of attention. Lines can be actual objects, such as a fence, or could even be shadows on the ground. Post your favorite photos on our Flickr site.

Let us know that you're playing along. In the comments, tell us about a road that you are looking forward to traveling down.

Sunday, July 19, 2009

Lesson #3: Framing--Wrap Up

I don't know about you but I was busy this week, and it was difficult to squeeze in the third photo assignment into my crammed schedule. Luckily a trip to the zoo and carrying my point-and-shoot in my purse allowed me to capture a couple of great framing shots.

But I'm going to keep this technique in the back of my head as we move forward because even with the few images that I captured, I can see how the composition is so much more interesting when the subject is framed by other elements in the environment. What great framing opportunities did you capture this week?

Here are a couple of examples that were posted to the Shutter School Flickr group. Good work, everybody!

From Rob of Jana and Rob.

From ljam.

From Jana of Jana and Rob.

Join us on Wednesday when the next lesson will be posted!

Tuesday, July 7, 2009

Lesson #3: Framing--due July 19th!

On the edge!
  • Use foreground elements to frame your photo's subject.
  • Architectural elements work well (windows, doorways, arches, and so on), but you can find any number of interesting elements to use for framing your photos.
  • Make sure not to overpower the subject!
  • This might be a good lesson to begin practicing depth-of-field. (we will have an upcoming lesson that addresses this more fully!) D of F is the distance in front of and behind the subject that appears to be in focus. By adjusting your aperture and zoom, you can force the camera to focus on subjects farther back in the scene.
Examples:

Resources:
Spend this next week framing pictures in a variety of ways and post your favorite shots on our Flickr site. Remember that framing can be done in nature as well as with man-made things such as doorways and windows.

Let us know that you're playing along. In the comments, tell us about a door that you walked through that changed your life.

Sunday, July 5, 2009

Lesson #2: View Angles--WrapUp

Woohoo! We completed the second Shutter School lesson.

This past week and a half we explored the world from a new perspective. We had to stand on chairs and get down on our bellies, but the photos from this assignment have an added level of intrigue. The unique view angles forced us to look at things differently, to consider them from another angle, to really understand how they interact with the rest of the environment.


Take a look at some of the photos we experimented with:

From Jana of Jana and Rob.

From ljam.

From Rob of Jana and Rob.

From ljam.

Join us on Wednesday when the next lesson will be posted!

Thursday, July 2, 2009

Just in time for the Fourth!

Extra! Extra!

If you're headed out for an amazing Fourth of July fireworks celebration, don't forget your camera! Here are some tips for capturing the awesome light displays as they illuminate the sky.

From JuanJ.

Wednesday, June 24, 2009

Lesson #2: View Angles--due July 5th

Get a new perspective!
  • Typically we view the world head-on, in a straight forward direction. But to add interest to your photos, explore different angles.
  • Get down onto the ground and angle your camera up and towards your subject.
  • Get up on a chair or table and shoot from above.
Examples: Other Resources: This next lesson is also about how to better compose your images. While not appropriate for all subjects, viewing your subject from a new angle asks to to expand your perspective--and might make for a very intriguing photo. Experiment with this composition technique, and post a few of your favorite photos on the Shutter School Flickr group by July 5.

Be sure to let us know that you're playing along by leaving a comment answering this question:
If you could view the world from someone else's perspective, whose would you choose and why?

Sunday, June 21, 2009

Lesson #1: Rule of Thirds--WrapUp

Congratulations on completing the first lesson of Shutter School!

This past week and a half, we each experimented with the Rule of Thirds. It took a bit of practice, but I think that most of us would agree that by following the "rule" (whether you are cropping your photos as you snap the picture or after the fact with PhotoShop), most of our photos ended up even more spectacular!

Here's a sample of the photos we snapped this week:

From ljam.

From Rob of Jana and Rob.

From SherrieP.

From Jana of Jana and Rob.

Keep shooting! Keep practicing the Rule of Thirds! And keep uploading to our Flickr group.
The next lesson will be up on Wednesday--look for it!!

Tuesday, June 16, 2009

Shutter School Flickr Site

I've been practicing the "Rule of Thirds" a lot lately. It really helped to begin with that lesson, because instantly some of my pictures look better. That's definitely motivation to learn more! Now that I know about the rule, it seems like I'm looking at everything I see in a new way. "How would that look over to the side a bit?" or "Wow, that road divides everything in thirds just perfectly". Am I the only one doing that??? Possibly. But, go on over to our Flickr site and check out some of the photos that have been uploaded dealing with the Rule of Thirds. And if you've taken a few shots, be sure to add them. Here's a photo I recently took while trying out the "Rule". Next time I would try to put that top "grass line" a bit closer to the top and Emmi a little bit further to the left, but at least it's more interesting than having her "dead center". Anyone else have suggestions for improving it? You can add your comments for each photo on the Shutter School Flickr Site.

Friday, June 12, 2009

Free Photo Editing Class

Just wanted to share a link with you----Jessica Sprague is offering a free photo editing class. This is an online class that will teach you how to use some of the basic features of Photoshop or Photoshop Elements. She even includes a link to download a 30-day trial of the software. I'm definitely going to sign up for this. I've been wanting to learn about Photoshop and at this point, know basically nothing. Anyone want to join me?

Wednesday, June 10, 2009

Lesson #1: Rule of Thirds--due June 21st

Move it from the Middle!
  • The goal of the Rule of Thirds is to create a photograph which is interesting and captures the viewer's attention.
  • The Rule of Thirds enhances the impression of action.
  • Divide the image into thirds, both horizontally and vertically; then crop your photo so that the main subjects are located around one of the intersection points rather than in the center of the image
  • Placing the horizon at the top 1/3 or bottom 1/3, then tells the viewer that this is a sky or land shot without having them to guess.
  • Some cameras have an option to show the Rule of Thirds grid lines on the viewfinder/screen.
  • Remember, sometimes rules are meant to be broken!
Examples:

Other Resources:

This will be our first challenge. Get out your camera and snap away. As you look through the lens, try to practice the rule of thirds. You can experiment with placing the subject in different thirds to produce different effects. Post a few of your favorite photos on the Shutter School Flickr group by June 21.

Be sure to let us know that you're playing along by leaving a comment telling us your name, where you're from, and your three favorite foods!

Friday, June 5, 2009

Share the Shutter School love!

Want to add a Shutter School button to your own blog?
Here's how in Blogger:
  • While logged in to your Blogger account and looking at the "Dashboard," click on the "Layout" link.
  • Choose "Add a Gadget" and then choose "HTML/Javascript."
  • Copy the following HTML code: <a href='http://shutterschoollessons.blogspot.com/'><img alt='Shutter School' height='220' id='Image1_img' src='https://blogger.googleusercontent.com/img/b/R29vZ2xl/AVvXsEgFBiZ1kS8ZYLYtH-1cCM0hhFImfydu5Uj8oNLXXzvwOz2bvtU66NSDgdPaKpc5F8K-SkQl1QenXph0kl2__uC8mNP5gIyF6nfvsPDOm_mD3OPJ3ZkxojAX4jAPE-EKFR7zNWo4XmO81I9Z/s220/ShutterSchoolBlogIcon.jpg' width='175'/>a>
  • Make sure to click "SAVE" on the "Configure HTML" page and the "Add and Arrange Page Elements" page.
You should be able to use the same code in Typepad or other hosts, but the process might be a little different.

Tuesday, June 2, 2009

Welcome to Shutter School

  • If you drool over professional photographer blogs, but are too embarrassed to post your own photos...
  • If you dream of capturing bright blue skies and vivid green grass, but have never switched out of automatic mode...
  • If your scrapbooks are cleverly designed, but the quality of the photos distracts from the pages...
  • If you wish you had captured that spontaneous moment earlier, but forgot to bring your camera along...
Then welcome to Shutter School!
Shutter School is an online photo challenge which hopes to inspire you to pull out your digital camera and learn to love your lens.

How it works:
  1. Every 10 days (or so!) a new lesson will be posted on this blog, as well as our personal blogs, Dancing Commas and Mommy's Treasures. The lesson will focus on a single photography skill (either a camera mode, a style of photography, or a hint about composition). Along with a list of tips about that skill, a directory of other photography resources will be listed for you to gain an even better understanding of the concept.
  2. We'll ask you to comment on the post to take attendance. (We want to know who is playing along with us!) Also, please feel free to share your own hints or other resources that you find. Let's learn from each other!
  3. Your homework is to spend the next 10 days practicing that skill. Carry your camera with you. Pull out your manual to figure out how the skill applies to your particular camera. . . and snap away!
  4. At the end of the two weeks (or as you go along), you will want to post your best images to our Flickr group: "Shutter School" and if you have one, to your own personal blog.
  5. To complete the lesson, we'll post some of the photos that best employ the lesson's technique.
Gather your supplies and join our Flickr group, so that you'll be all ready when the first lesson is posted on June 10!

Be sure to leave us a comment below or on our individual blogs so that we'll know you want to learn with us---I think it will be fun!

Frequently Asked Questions

Frequently Asked Questions:

Q: What do I need to do to play along with a lesson?
A: A camera, digital photos, a Flickr account, and willingness to share your creativity! A personal blog and photo editing software are helpful, but not necessary.

Q: How do I get a Flickr account? Is it free?
A: You can create a basic Flickr account for free by visiting Flickr.com and clicking on the "Create Your Account" link. You will need to sign up for a Yahoo! id, if you don't already have one. When you have a free Flickr account, you can upload 2 videos and 100MB worth of photos each calendar month. For just $24.95 a year, you can upgrade to a Pro account which allows unlimited uploads and unlimited storage. You can do that here.

Q: How do I join the "Shutter School" Flickr group?
A: Once you have created your Flickr account, go to http://www.flickr.com/groups/shutterschool/, and click the "Join?" link. Send the group administrator a message asking for an invitation, and we will accept your request shortly!

Q: How do I add my photos to the "Shutter School" Flickr group pool?
A: Once you have uploaded photos to your account, the easiest way add a photo to a group pool is to go to the photo's page and click the "Send to Group" button between the photo title and the photo. Then choose the group you want to send it to, and you're done!

Q: How can I get my hands on some photo editing software?
A: Many printers and digital cameras come with some basic photo editing tools. If you are interested in getting something more professional, let us know and we'll be able to point you in the right direction. Many colleges and universities offer these kinds of software at greatly reduced rates, so if you're enrolled, this might be the time to take advantage of that discount.

Q: Do the photos I post have to be ones I have taken myself?
A: Yes, please only use photos you have taken.

Q: Do I have to be invited to play?
A: Nope. Jump in, sign up and have fun!

Q.
What if none of my pictures are turning out very well. Should I go ahead and post them?
A. You bet! Chances are, someone else is having or has had the same problem and they may be able to give you some hints. Plus, this is supposed to be fun--no grades assigned, no failing!

Q: Must I participate in every lesson?
A:
Nope. Join us for any lessons that you want to be a part of. Feel free also to look back at Archives to gain further photo insight. The point is to learn about your camera, not to be a stickler for the rules!

Q: Are there prizes?
A: The prize is learning to love your lens.

Note: If you have any questions regarding Shutter School, please leave a comment on this blog or on either Dancing Commas or Mommy's Treasures.